Free wiring diagrams for Ford car stereo


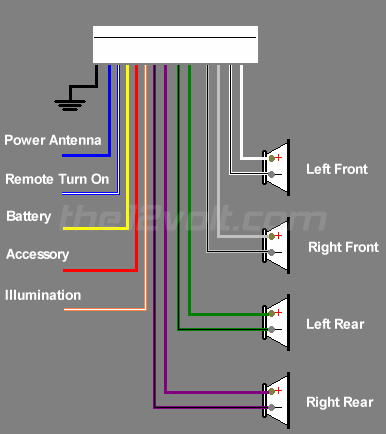
Get free wiring diagrams for Ford car radio


FORD
ford
 

FORD FX3000 MADE IN KOREA BY INTERCONTI
A94 SX 18 C 8122 AA
Ford fx3000 connector
 

FORD SOUND 2000
ford-sound-2000
 

FORD 1998 - 1999
ford-1998-99-connector


FORD 2006 R (VW SHARAN, FORD GALAXY)
95VW-18K876-JB FDZ7R2WM059374 Made In Portugal
ford-2006-car-radio-connector
 

FORD 2006 RDS (Portugal)
FORD 4500 (made in Brazil)
FORD 5000 RDS (Portugal) part no. 96AP-18K876-CC
FORD 7000 RDS (Portugal) part no. 95GB-18K876-BA
ford-2006rds
 

FORD 2007 RDS.
ford-2007-connector
 

FORD 2007 RDS 94FP-18K876-HA (Без внутреннего усилителя НЧ)
FORD 2007 SOUND2 RDS VWZ7Z3 (Без внутреннего усилителя НЧ)
ford2008rds
 

FORD 3500 (4S61-18K876-BA)
FORD 4500 (2S61-18C815-AF)
FORD 4500 (4S61-18C815-AA)
ford-3500-connector
 

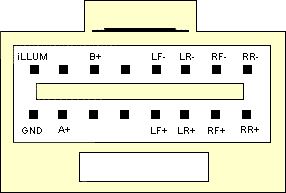
FORD 3000, FORD 4000 (Разновидность разъёма)
ford-3000-4000-connector
 

FORD 3000, FORD 4000 (Ещё одна разновидность разъёма)
ford-3000-4000 connector
 

FORD 5000C
ford-5000c
 

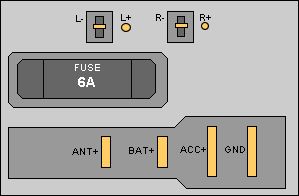
FORD 5000, FORD 6000, FORD 7000 (Разновидность разъёма)
ford-5000-6000-7000-autoradio-connector


FORD 5000 RDS EON (Portugal) part no. 98AP-18K876-BC
 
ford 5000 eon connector
 

FORD 6000 MNE MP3
ford-6000-mne-mp3
 

FORD 6006E CD RDS EON (1S7F-18C815-AD) VISTEON
ford6006e-cd-rds-eon
 

FORD E-STR 22DPS710
A91SX-18K876-EA (INTERCONTI)
ford-e-str-22dps710-connector


FORD Mondeo, Galaxy, Mazda, Ford CD MP3
ford-mondeo-car radio
 

FORD Windstar
ford-windstar-connector


FORD Radio Navigation System BP1422 (Germany)
ford_rns


FORD 1L2F-18C868-BB Made in MEXICO
ford-1l2f-18c868-bb
 

FORD 2028 (89GB-19B160-AA) Made In Japan
PRODUCED BY SONY CORPORATION
Casette not have its own power amplifiers
ford-2028
 

FORD 2008 RDS Made in Portugal
ford2008-rds
 

FORD F57F-18C852-BE (made in Mexico)
ford-f57f-mexico


Wiring diagrams for Fisher

Free wiring diagrams for Fisher

FISHER AX-R502

 
FISHER AX-835
FISHER Car Radio Stereo Audio Wiring Diagram Autoradio connector wire installation schematic schema esquema de conexiones stecker konektor connecteur cable shema

Free wiring diagram for Daihatsu car stereo

Free wiring diagram for Daihatsu car radio

This is the wiring diagram for the Daihatsu car stereo models

DAIHATSU car stereo wiring pinout

daihatsu wiring
1 -+12 VOLT IGNITION WIRE
11- Speaker RF+
2 -GND
12 -Speaker RF-
3 -+12 VOLT BATTERY WIRE
13 -Speaker LF+
4 -Dash Light Dimmer Wire
14 -Speaker LF-
5 -Power Antenna Turn On
15 -Speaker LR+
9 -Speaker RR+
16 -Speaker LR-
10- Speaker RR-
-


Now you are able to wire your car radio without problems, for more advice and help please post your comments and remarks thanks.

Find free wiring diagrams for Daewoo


wiring diagrams for Daewoo car radios

DAEWOO
daewoo
1 -+12 VOLT IGNITION WIRE
11 - Speaker RF+
2 -GND
12 -Speaker RF-
3 -+12 VOLT BATTERY WIRE
13 -Speaker LF+
4 -Dash Light Dimmer Wire
14 -Speaker LF-
5 -Power Antenna Turn On
15 -Speaker LR+
6 -Speaker RR+
16 -Speaker LR-
7 -Speaker RR-
-
 
DAEWOO AKF-4087XC, AKF-9625
daewoo1
1- Speaker RR (-)
8 - SpeakerRR SP (+)
2 - Speaker RL (-)
9 - Negative ground
3 - Auto anten
10 - Light lluminator
4 - Acc B (+) power
11 - Battery B+
5 - Speaker FR SP (+)
12 - Speaker FR SP (-)
6 - Speaker FL SP (+)
13 - Speaker FL SP (-)
7 -Speaker RL SP (+)
-
   
DAEWOO AKF- 43065
daewoo-akf43065
1-Front R-CH SP+
7 -Rear L-CH SP+
13 -No conection
2 -Rear R-CH SP+
8 -Front L-CH SP+
14 -Gnd
3 -ILLumination
9 -Front R-CH SP-
15 -No conection
4 -ACC B+
10 -Rear R -CH SP-
16 -No conection
5 -Back-UP B+
11 -ILLumination
17 -Rear L-CH SP-
6 -No conection
12 -Auto Ant B+
18 -Front L-CH SP-
 
DAEWOO AKF- 8846, AKF- 8847
daewoo_akf8846
1 -Speaker RF+
7 -Speaker LR+
12 -+12 VOLT IGNITION WIRE ANTENN
2 -Speaker RR+
8 -Speaker LF+
14 -GND NEGATIVE
3 -ILL DIMM(B+)
9 -Speaker RF-
17 -Speaker LR-
4 -ACC B+
10 -Speaker RR-
18 -Speaker LF-
5 -BACK UP B+
11 -LL KONTROL V
-
 
DAEWOO AKF-9255V
daewoo2
1 -Speaker RF+
9 -GND Line out
2 -Speaker RF-
10 -Speaker LF+
3 -Speaker RR+
11 -Speaker LF-
4 -Speaker RR-
12 -Speaker LR+
5 -GND
13 -Speaker LR-
6 -GND
14 -+12 VOLT IGNITION WIRE
7 -+12 VOLT BATTERY WIRE
15 -+12 VOLT IGNITION WIRE
8 -Line out R
16 -Power Antenna Turn On
 
 DAEWOO AKF-9255XV
daewoo_akf9255xv
1 -Speaker RF+ 

7- +12 Volt Ignition Wire               

19 -Speaker LF-
Ч
2 -Speaker RF-  
Ч
14 -                    

20 -Speaker LF+

3 -Speaker RR+ 

15 -питание antenna.  

-
-
4 -Speaker RR- 
Ч
17 -Speaker LR- 
 Ч
-
-
6 -gnd                

18 -Speaker LR+ 

-
-
 
DAEWOO AKF-9345
blau1
A
B
C
4-Питание B+
1-Speaker RR+
5-Лин
5-Antennaенна В+
2-Speaker RR-
6-Лин
7-U+ ACC
3-Speaker RL+
8-GND
8-GND
4-Speaker RL-
10-Amplifier
-
5-Speaker FL+
-
-
6-Speaker FL-
-
-
7-Speaker FR+
-
-
8-Speaker FR-
-


Free wiring diagrams for Daewoo car radios car stereo.

General car radio wiring diagram

General wiring diagram for car radios

142851
This is the general wiring harness for ANY aftermarket headunit. The only color missing is the blue/white which is your remote out.
Car Radio Wiring Diagrams


Disclaimer
*All information on this site is provided "as is" without any warranty of any kind, either expressed or implied, including but not limited to fitness for a particular use. Any user assumes the entire risk as to the accuracy and use of this information. Please verify all wire colors and diagrams before applying any information.


Typical Head Unit Wire Harness
Function Typical Wire Colors
Memory / Constant 12V(+) Yellow
Switch / Accessory Red
Ground Black
Illumination Orange/White
Antenna Remote Blue
Amp Remote Blue/White
Left Front (+) White
Left Front (-) White/Black
Right Front (+) Grey
Right Front (-) Grey/Black
Left Rear (+) Green
Left Rear (-) Green/Black
Right Rear (+) Violet
Right Rear (-) Violet/Black


PORT DESIGN INFORMATION

WHY GO PORTED?
Efficiency is the easiest one word reason for choosing ported over a sealed box. Everything is better with a little efficiency sprinkled on it. Ask any motor builder what they would do to a motor if it were theirs and they'd say turbo charge it! What does turbo charging do for an engine? It raises the efficiency. Why not apply this same thing to your audio system. Making the most out of the air space you have for a subwoofer enclosure, is the first step in raising the efficiency of your system. This means that you will utilize this space in the most efficient manner possible.

Designing a ported a.k.a. vented enclosure will not only give you added output, but can give you more low-frequency extension. This means louder and lower! Since the speaker system is the least efficient part of the whole audio chain, would it not make sense to make it as efficient as possible? Of coarse it does.

MORE SOUND, BETTER BASS
This is why venting is basically free output, and free sound quality. Local shops tell you that a small sealed box is the best way to go? Hit up your local hi-end home audio store and find out how many of those $20,000.00 pairs of speakers are sealed designs. You won't find many. Think efficiency, this will help you clear all of that smoke out of your eyes that most car audio manufacturers have been pumping all along.

HOW DOES A PORT WORK
Think of a box port not as a vent in the terms of a venting path for air to travel into and out of a box, but rather as extra cone area that is propagating acoustic energy from the enclosure to the cabin. The air in a port is fixed; it is trapped within the confines of the port walls. When the cone moves there is a corresponding change to the pressure in the box, that pressure change then causes the trapped air in the port to move either forward or backward. It moves as a solid unit, just like a speaker cone does. When you build a properly vented enclosure, its kind of like a two for one special! Since the port is essentially another woofer!

MORE RADIATING AREA
A passive radiator and a vented port work on the same theory. When a port mass moves back and forth, a pressure wave (sound wave) is sent into the cabin. The larger the port, the larger the radiating area is that creates the pressure. Tuning a port is tuning the mass of the trapped air in the port to the air mass in the box volume.

For all out no holds barred SPL efficiency, rule of thumb is the larger the box, the higher the output. The larger the box, the larger the ports can be for a given frequency tuning range. There is no substitute for cubic inches. Some drivers can achieve high efficiency in moderate sized vented enclosures (3 to 4 cubic feet) but will continue to increase in output with increase in volume and port size. Multiple drivers in such enclosures can yield a frightening amount of output and should be used with caution.

THE RIGHT PORT AREA
Most modeling programs that simulate box responses were written for home audio use. They are not suited for high output systems. The port area defaults are inadequate. The port area must be commensurate with cone area. If the port velocity gets too high, the port no longer functions as a port, you end up with a leaky sealed box, double bad.

Lets say we have a 12 inch speaker in a box, roughly 100 sqin of surface area. Many programs and manufacturer sites will suggest a 4" diameter port for a 12" vented box. A 4" diameter port has about 12 sqin of area. This is about an 8-1 ratio of cone area to port area. If the 12 inch cone moves 0.25", the port must move 2.0". It can handle this, but when the cone is moving 1.0", the port must move 8 inches! Now you've got a leaky sealed box.

You need more port area for a clean sounding, high output system. The perfect port formula is this: 16 sqin of port area per cubic foot of box volume. The port should be 16 inches long. Remember, the port is tuned to the box volume, not the sub(s).

This formula was derived from 1000s of hours of in-car testing and 1000s of installs. It works. It takes into account the need for increasing port area for increasing cone area. When combined with the correct box requirements, you'll end up with the perfect match.

VARIABLE PORT TUNING
The design philosophy of low moving mass, well controlled suspension and strong, linear magnetic systems allow the user many design applications never realized with traditional speakers. The growing popularity of the SPL competitions has led to new engineering requirements for an audio system.The problem lies in the fact that the frequencies where a vehicles peak SPL may occur rarely ever coincide with a tuning frequency that promotes utmost sound quality. The peak SPL frequency is usually somewhat higher that the tuning frequency for sound quality.

The use of a larger than normal port will allow the user to find the cars peak frequency for greatest SPL. Reducing the port opening will lower the box tuning frequency and provide loading to the woofer over a wider bandwidth. This will improve the transient response and impact of the system. The higher tuning frequency redirects the woofers radiating energy into a narrow band which when tuned to coincide with the vehicles peaks can yield dramatic SPL numbers. The focus of attention here should be to tune the system to each application. Although the general box recommendation will yield very satisfying results, competing at the highest levels of SPL or SQ contests, or simply yielding the best possible results are directly related to methodical tuning.
Calculate Port Size
The box port can be calculated with a simple formula. Box volume in cubic feet X 16 (the amount of port area in square inches per cubic feet of box volume). For example, 3.4 cuft X 16 sqin= 54.5 square inches of port area. Try to stay within 10% of this number.


The port length should be 16 inches deep. This tunes the boxes to about 40 Hz.

How To Make A Slot Port
The easiest and most effective way to build a port is to use a slot shaped port that uses 3 sides of your enclosure as port walls. If the port is located at one end of the box, only one additional piece of wood is required to complete the port. The additional piece of wood should be spaced off the end of the box.

The port area is in square inches, meaning it takes height times width to calculate total area. A port 4 inches high by 4 inches wide would calculate as 4 X 4= 16 square inches.

In our example box, we have an inside height of 14.5 inches. To calculate the slot width that would make a total area of 54.5 square inches, and we use 14.5 inches as the height: divide 54.5 by 14.5= 3.76. Round that figure to nearest ¼ inch, and you get an offset measurement of 3 ¾ inch wide. The slot port would be 3 ¾ inches wide by 14 ½ inches tall.

You don’t have to get too critical about the box and port volume, a good rule of thumb is that if you stay within 5-10% of calculated volumes, there will be very little if any audible effects.

Port Length Obstructions
Some port lengths do not allow for 16-inch port depths without some sort of modification. The rule of thumb is not to let the end of the port get any closer to the back wall than the width of the port. So back to our example, we have an internal box depth of 12.5 inches. We need a 16-inch deep port. We will have to bend the port along the back wall to get the full port length. To calculate where to make the bend, subtract the port width from the inside box depth. 12.5 – 3.75=8.75. We must bend the port at 8.75 inches, then continue the port parallel to the back wall for an additional 7.25 (8.75+7.25=16).

You now have an L shaped port totaling 16 inches in depth.


WHY GO PORTED?


I don’t believe in the tiny sub box theory. If you are looking for tiny sound, get a tiny sub and put it in a tiny box. Be happy. If you are looking for real bass, you need to have a real box.

In order to get true high performance, you have to make the most of the available airspace you have. To do otherwise is wasting your time, energy and money. Don’t try to fit a larger speaker in a box that is better suited for the next size down. The smaller sub in the right space will outperform the larger sub in too small of airspace.

The first step in getting major bass in your vehicle is to allocate the space for your enclosure. If you really want to flex some sheet metal, the old adage applies, “there is no substitute for cubic inches”. The more space you make available, the higher the potential spl.

You don’t have to use a large amount of enclosure space to make a loud system; loud can be done with a single sub. The amount of loud needs to be determined as you figure out what space you plan to give up. Really loud bass, where you have to scream at your passengers, can be done on a single or double woofer setup. Stupid loud bass, where there is no point in trying to communicate in the vehicle, takes more space and bigger/more subs. F@#$ing crazy loud bass, where it is impossible for the car next to you to communicate inside his vehicle, takes even more space, even more subs and a gazillion watts of power.

A few tips on what to pay attention to when determining the box shape:

If you plan to use a rear firing setup in a trunk car, make sure your box doesn’t seal off the trunk from the passenger compartment. You need to leave some space for the waves to pass back into the interior of the car. Either make the box as low as possible so the wave passes over the box and enters the cabin via the seatback and rear deck, or reduce the width of the box so the wave can pass to the side and into the car’s interior. A big, giant box may make your trunk extremely loud, but all you’ll hear is muffled rattle if the box takes up the whole space behind the rear seat and under the rear deck.

If you have a hatchback car, keep the box as far back in the vehicle as possible. Keep the port as far to the rear as possible.

Becker Free car stereo wiring diagram

Becker car stereo wiring diagram


BECKER AVUS, AVUS2000, GRAND PRIX
becker Avus
      
A.A.-Power Antenna Turn On
1 -+12 Volt Battery Wire
2 -Dash Light Dimmer Wire
3 -+12 VOLT IGNITION WIRE
4 -Gnd
 
BECKER GRAND PRIX CD
A
B
C
1-Spekaer Control
1-Speaker RR+
1-Line out LR
3-Tel mute
2-Speaker RR-
2-Line out RR
4-+12 Volt Battery Wire
3-Speaker RF+
3-Gnd- Line out
5-Power Antenna Turn On
4-Speaker RF-
4-Line out LF
7-+12 VOLT IGNITION WIRE
5-Speaker LF+
5-Line out RF
8-Gnd
6-Speaker LF-
6-Control
-
7-Speaker LR+
7-20-Datalink
-
8-Speaker LR-
-

wiring diagram radio, Free stereo wiring diagram, car radio audio

Clarion car stereo wiring diagram

Find free wiring diagrams for Clarion


CLARION CXR401
clarion
1-Speaker RF-
9-Speaker LF-
2-Speaker RF+
10-Speaker LF+
3-Speaker RR-
11-Speaker LR-
4-Speaker RR+
12-Speaker LR+
5-Power Antenna Turn On (?)
13-GND
6-+12 VOLT IGNITION WIRE
14-+12 VOLT BATTERY WIRE
8-Dash Light Dimmer Wire (?)
-
 
CLARION RAX660DZ
clarion2
1- Speaker LR+
9- Speaker LR-
2- Speaker LF-
10 -   ---
3- Speaker LF+
11-+12 VOLT IGNITION WIRE
4- Speaker RF+
12 -   ---
5- Speaker RF-
13-Power Antenna Turn On
6- Speaker RR+
14-Dash Light Dimmer Wire
7- Speaker RR-
15-+12 VOLT BATTERY WIRE
8- +12V
16-GND
top