
SimplySellular has successfully relieved the operational burden of managing a so-called 911 cellular phone program. You should be aware of the fact that by donating your cell phone you can do more than just provide emergency communications for people who are in need. When you donate your old cell phone, you help to provide funds that support the law enforcement activities as well as victim services organizations in the United States.
Simply Sellular is dedicated to helping the environment by finding new homes for cell phones that would otherwise end up in landfills. There are currently over 100 million surplus cell phones in the U.S. with that number expected to exceed 150 million by 2006. Your "useless" cell phone can also be of great use to disadvantaged people and those who may need one only for emergency 911 purposes.
A Simplysellular.com cell phones fundraiser is a great way to help out your school, church, or favorite organization at absolutely NO COST TO YOU! There are over 100 million old cell phones lying around houses in America . You probably have some in your own home!
www.SimplySellular.com
As we advance through the decades with progression in electronics, science and technology we must not forget the basis of our modern day sources of transportation. I would like to explicate a system in which I am fairly familiar with and have been the highlights of my interests. This is the recent power developments and characteristics of a four-cycle engine. Also known as the Otto cycle engine, the four-stroke engine works of off many mechanical components that simply derive power on the basic mixture of air and fuel. Hence the name “four cycle” such an engine consists of four complete strokes or cycles to consume and make power. With the completion of four cycles, intake, compression, power and exhaust, such a machine can thoroughly and consistently make power.
Today, manufacturers are concerned with meeting emissions standards, which is why many changes have been made to the four-cycle engine. Some changes may consist of variable valve timing (VVT); programmable fuel injection (Pgm-Fi) with electronically controlled fuel mapping, and turbochargers. Those all can increase power output, and some, efficiency.
Many parts and components have taken over such standards and exclusively expresses the advantages, due to more intake and less fuel. One device is called a turbocharger system. Most cars with engines are naturally aspirated, which means the engine sucks air through the intake manifold and completes the intake stroke through means of normal atmospheric pressures. Optimum barometric pressure readings of NA engines are about 1.0. The NA engine is restricted to produce it’s maximum power output due to the loss of volumetric efficiency (air forced into the cylinders with a mixture of gasoline). The ratio of air to fuel is very important in determining horsepower. The turbocharger can do all this and much more. Here is a brief background.
The turbocharger is a device mounted to the intake manifold. It is a circular air pump operated by exhaust gases. It consists of a compressor on the intake side, shaft in the middle and turbine on the exhaust side. It is used to improve engine performance through means of a higher air compression status and the same or less amount of fuel to the cylinders. The turbocharger’s compressor can spin up to 100,000 revolutions per minute. One disadvantage of such a turbo-charged engine application is the stress of mechanical parts due to heat. I may suggest an inter-cooler to provide cooling efficiency of exhaust gases inside the turbocharger. This is mostly important because high temperatures of gases contain less oxygen than normal cool temperatures. Thus, this may result in a loss of performance and throttle acceleration.
The turbocharger can be very useful for dramatic horsepower gains and engine performance, although installing such an application may sacrifice reliability and engine longevity, with the addition of changes in electronics and ECU’s. Many who own import cars are buying such systems because of overall 30-60% horsepower gains.
Another example is the expanded technology of intake and exhaust valves. Valves work off of the rotation of an engine’s camshaft. These newly designed valves actuate by electronics inside of the engine. Variable Valve Timing also known as (VVT) is definitely a huge change in the advancement of gas mileage, efficiency, and power. If a car with VVT has sixteen intake valves, and sixteen exhausts valves, only sixteen of the thirty-two valves work, not thirty-two. Due to the electronic shutdown of the valves, only all thirty- two valves will work at a specified rpm range. Thus, reducing fuel consumption and more air intake, making plenty more lb. of Ft. torque.
I would also like to explain the programmable fuel injection system (Pgm-Fi). Many engines today have been developed with electronic fuel injection. Every engine is either carbuerated, or fed fuel through an injector of each cylinder by electronics. The newly revamped EFI engine is the result of electronic injectors. Controlled electronically, these injectors can account for finer fuel atomization. The finer fuel atomization causes the fuel to be dispersed evenly, and even finer inside the cylinder before the power stroke. This causes less fuel to burn longer, decrease rapid combustion, and the result, more power!
We can conclude that cars today have undergone extensive changes and developments in four-stroke technology. I feel that efficiency of automobiles and power is one in the same. I really like cars with excellent performance and gas mileage. Take for an example Honda’s automobiles. Their cars from the factory can be fast, but most of all, they are very efficient. This is the new age of automobiles. This is only the very basis of engineering excellence, and the ongoing determination to research and develop the world’s most powerful and efficient automobiles.
Visit: Pioneer GM Amps - Pioneer PRS Amps
Cars have always been a natural target for thieves, as they can be smoothly sold at a good price. Today, car thefts are rising at an alarming rate, and it is said that a car is stolen every 20 seconds. In order to curtail the rising trend in car thefts, alarm companies are making highly improved and new alarm systems for cars. They are proving to be very handy and effective and are recommended by most car dealers.
Remote start car alarms (remote car starters) are the latest improvement and have amazing high tech features. These systems are outfitted with the latest technology of antiscan and antigrab. The multiple programmable features of the remote start car alarms, makes them very practical for car users. These alarms are also operational in cold weather. The exclusively designed remote is set with a LCD display that provides the user with a car/alarm status.
The remote start works in all automatic, manual and diesel cars. The anti-carjacking feature makes this alarm system highly reliable. These alarms provide maximum security to a car because of the built in vibrating sensors that are fitted in the door, boot, and bonnet. They also have a silent arm, disarm and alert feature. They provide, additional optional features like total closure and remote boot release, and come with smart LED indicators, backlights and automatically activated interior lighting. The remotes are very user friendly, as they have an inbuilt query function, real-time clock and an alarm clock.
Remote start car alarms are often expensive, but if a person owns an expensive car, then a remote car alarm is a sensible investment. Keyless Car Starters
Clear sound is considered to be one of the most important elements of a great home theater experience. Quality sound really brings film to life and that fact spurs many home theater aficionados to select their home speakers and sound equipment with great care.
Too often, though, the speakers that sounded great in the listening room don’t pack the same punch when installed at home. The issue is usually related to speaker positioning.
There are a few factors anyone should consider when installing home speakers. One should be aware of proper distancing, height and angling (also referred to as toe-in). Sometimes the perfect set-up is outlined in the owner’s manuals and documentation that come with the speakers. In other cases, it’s necessary to evaluate proper positioning with a “trial and error” technique.
If your speakers aren’t bringing the movies to life for your home theater system, don’t give up and go purchase a new sound system until you first double-check the positioning of your speakers. Even small adjustments can have a huge impact.
By finding the optimal positioning for your speakers, you can breathe new life in what you may have believed to be an inferior speaker. You can also begin to enjoy the movies the way you had hoped to when you first decided to invest in a home theater system.
See also: Outdoor Speakers
Subwoofers have been used widely in cars to enhance the sound quality and make the driving experience more enjoyable. There are 4 main sizes of car subwoofers:
8 inch subwoofers: They are considered to be the smallest subwoofers for pumping out bass without sacrificing trunk space.
10 inch subwoofers: They are commonly used subwoofers for installations where space is at a premium.
12 inch Subwoofers: They are the most common subwoofer size; 12" subs provide good response at low frequencies.
15 Subwoofers: They are larger car subwoofers that hit harder and even deeper than 12 inch subwoofers.
Before you buy your next subwoofer, it’s really important to check out which subwoofers fits your needs the most. This way, you will eliminate any future problems when it comes to installing you sub.
Be sure to select the wiring kit that's appropriate for your amplifier. Kits come in a variety of sizes: 10-gauge, 8-gauge, 4-gauge:
- 2 Gauge amp wiring kits: Mainly used for high powered systems and you need to buy a capacitor as well.
- 4 Gauge amp wiring kits: Generally for systems 400 to 1000 watts.
- 8 Gauge amp wiring kits: Is used for systems 100-200 watts.
- 2 Gauge amp wiring kits: Mainly used for high powered systems and you need to buy a capacitor as well.
- 4 Gauge amp wiring kits: Generally for systems 400 to 1000 watts.
- 8 Gauge amp wiring kits: Is used for systems 100-200 watts.
The most common and familiar piece of Car audio equipment is the radio/tape player/CD player/DVD Player which is generically called as a Head unit, which also can be called a head deck, after older tape decks. It is also the most likely component to be upgraded with an aftermarket item. A recent development in head unit technology has been the addition of CD players with MP3, Ogg, WMA, AAC, and USB, Bluetooth and Wi-Fi support. Even with the rampant ubiquity of solid state MP3 players, car audio systems with line-in jacks and other standards are only in their infancy, and that since tape adaptors are often used with tape players, people are now viewing car radios with built-in CD players as "misfeatures" of the audio system since people now often "rip" their CDs onto their computers.Most modern cars include at least a CD player/ CD recorder, and some have the option for a CD changer, which holds multiple disks either in the head unit itself or in a separate unit usually located in a trunk or console.More recent is the addition of DVD players and LCD screens. Depending on the head unit, the LCD screen is either integrated such that it slides out and folds up, or integrated into the instrument console. Otherwise, the DVD head unit feeds video output into separately mounted displays, either folding down from the roof, or mounted into the headrest for viewing by rear seat passengers.
Advances in electronics allowed additions to the basic radio and Motorola offered 45 rpm disc players fitted to some Chryslers from as early as 1956. Tape players using reel to reel equipment followed but their bulk ensured popularity was limited but this changed in 1964 when Philips launched the Compact Cassette. Other early manufacturers and car enthusiasts started building extra car audio amplifiers to run on 12 volts (the standard voltage in automotive electrical systems). Jim Fosgate, later to become the founder of Rockford Fosgate subwoofers, was one such pioneer. The company a/d/s also brought an amplifier to market in 1978.At first, speakers from the home audio and professional markets were simply installed into vehicles. However, they were not well suited to the extremes of temperature and vibration which are a normal part of the environment of an automobile. Modified drivers were developed to cope with these factors.Today, advances in acoustic technology mean that even two 10-inch car speakers in a well-designed efficient enclosure can produce more than 100 decibels SPL (sound pressure level) within the cabin.
Car Audio Blog
The video screen may also show video output of an integrated component such as a navigation system 3G cell phone or parking cameras that could be automatically activated when the car is put into reverse.
Advances in electronics allowed additions to the basic radio and Motorola offered 45 rpm disc players fitted to some Chryslers from as early as 1956. Tape players using reel to reel equipment followed but their bulk ensured popularity was limited but this changed in 1964 when Philips launched the Compact Cassette. Other early manufacturers and car enthusiasts started building extra car audio amplifiers to run on 12 volts (the standard voltage in automotive electrical systems). Jim Fosgate, later to become the founder of Rockford Fosgate subwoofers, was one such pioneer. The company a/d/s also brought an amplifier to market in 1978.At first, speakers from the home audio and professional markets were simply installed into vehicles. However, they were not well suited to the extremes of temperature and vibration which are a normal part of the environment of an automobile. Modified drivers were developed to cope with these factors.Today, advances in acoustic technology mean that even two 10-inch car speakers in a well-designed efficient enclosure can produce more than 100 decibels SPL (sound pressure level) within the cabin.
Car audio competitions started in the early 1980s in a quest to find the loudest and/or most outrageous installations. For example, in 1985, Wayne Harris famously modified a 1960 Cadillac Hearse to feature three 24-inch subwoofers as well as eight 12 inch car subwoofers. Little consideration was given to sound quality early on, but in the early 1990s, several organizations, including IASCA, began car audio competitions focusing on sound quality. The two styles -- SPL vs. sound quality -- have become almost mutually exclusive. The loudness competitions have become known as dB drag racing.
Below are important car audio companies:
Car Audio Blog
Pioneer Car Audio
Kicker Car Audio
JVC Car Audio
Kenwood Car Audio
Alpine Car Audio
What is at the heart of cool cars everywhere? Is it the speed they can travel at? Is it the thought of the wind brushing your hair? If it's the latter, then you have a soft top (convertible), or someone's pinched your roof!
Details or Sample:
What is at the heart of cool cars everywhere? Is it the speed they can travel at? Is it the thought of the wind brushing your hair? If it's the latter, then you have a soft top (convertible), or someone's pinched your roof!
Well, it could be either of these things. Or perhaps cool cars mean something else to you entirely. But to me, it is the shape of the car. Not so much cool cars but cool curves ... Sexist? Perhaps, but true none the less. I think I classic car is defined by it's architecture.
Look at any sports models over the years. What has defined them, made them stand out? Ok, the price is one thing, but take a step back and really think about what makes a hot car so cool?
There is something else that makes a car cool, at least as far as I am concerned. And that is the interior. Or to be more precise, what the interior is made of. My first car lives in my memory to this day, and surely that is the mark of a cool car. I can remember the smell of the leather seats and look of the wooden dash surround. Plastic just doesn't cut it, especially not in more mass produced models.
And it had curves!
So what else puts the cool into a car for you?
For me personally, low is cool. The closer I am to the ground, the better I feel. Some people like to have a high vantage point, and perhaps that is cool to them. It certainly helps to have a better view of the road from a practical point of view.
For many, the colour of a car defines its 'cool'. Red is often the colour to fuel associated with the hottest cars around (not surprisingly really). But what about black? There is something mystical about jet black automobiles, don't you think? To some, an unusual colour is the height of chic as far as a car is concerned. You might not like bright yellow or lime green, but your will always notice them, won't you. And to some folk, that is all that is required from a cool car.
Wholesale Car audio and video components have been increasing in cars recently due to the vast technology in car electronics to provide a high level of comfort and luxury. Every car (especially new) is equipped with 6 speakers and a head unit with CD/DVD player and GPS navigation system. Some car fans even upgrade their sound system with after the market subwoofer and amplifier for better sound quality. I’ll explain the main components of any car audio system below:
- Car speakers:
Car speakers actually reproduce the sound from electrical energy. Basically, there are two types of speaker "systems" that exist.
1. "Coaxial", "three way", "full-range", etc.
These speaker systems are designed to fit into the factory speaker located in your vehicle. They are often called a "speaker", but have more than one speaker, and will also contain a crossover.
2. "Components", "Seperates"
These speaker systems basically take everything from the above speaker system, and break it up into parts.
- Car subwoofers:
Car Subwoofers are loudspeakers made to generate the lowest frequencies, or bass end of the audible sound range. Car Subwoofers range from 4 inches in diameter all the way up to 36" meant for highly specialized scientific purposes. Subwoofer cones must move in and out with the longest possible extension because sound waves get longer as they get lower in frequency.
- Car GPS navigation systems:
Car navigation systems is an inexpensive upgrade to any vehicle. Aftermarket navigation systems use the newest technology and mapping software to get you from point “A” to point “B” without error. GPS navigation systems come with different types including Portable GPS and In Dash Navigation systems which usually include a Touch-Screen Monitor.
- Car amplifiers:
Car amplifiers are devices that take a small audio signal from a pre-amp, some power from your battery, and pass it on as a big audio signal to drive speakers. Audio amplifier power is measured in watts. The higher the watts, the more power the amplifier has. How much power you need depends on what you want out of your system. Amplifiers comes with different types such as Class D Amplifiers and Multi-channel Amplifiers.
Other car audio and video resources: Pioneer Avic - Marine Audio.
Car Blog
Kicker 07S10X2 Info:
THE HYPE Last year, the news spread like wildfire about the mammoth 18-inch subwoofer, nearly 100 pounds and 10,000 peak watts of pure pounding fury that uses a field-replaceable cone/coil assembly. Now enters the next chapter in the SoloX saga – the supersized smackdown is now available in a 10 and 12 too! KICKER’s most advanced subwoofers ever, the SoloX has been engineered with serious autosound competitors in mind. The SPL levels can get brutal in the lanes (many interiors have buckled under SoloX pressure), but the SoloX has already earned its sound-quality stripes too, winning IASCA and USACi SQ world championships. That means they sound good… really good. In its first year, the S18X set the industry on its ears (probably for protection!) with its heavy introduction, and it remains the centerpiece in the KICKER lineup with unimaginable power handling (5,000 watts RMS; 10,000 watts peak) and freakish size. All three use a field-replaceable, stamped-steel cone/coil assembly called a SPAIR. When it gets that loud, subs sometimes blow up, and we know you guys will give it a shot. That’s what the SPAIR is for – leave the BAM™ (Basket And Motor assembly) in the install and bring in the cone/coil piece for replacement.
Kicker 07S10X2
10" Solo X Series Subwoofer
Titanium Deposit Impregnated Cone
Stitched Rubber Surround
Simple Pull Apart Insertable Replacement
Stamped steel basket
Strain relief boots on tinsel lead wires
UniPlate V.2™ extended pole/backplate assembly
S4 Quad Spider Array
3.5" Dual 2 ohm Voice Coil
Car Audio Blog
THE HYPE Last year, the news spread like wildfire about the mammoth 18-inch subwoofer, nearly 100 pounds and 10,000 peak watts of pure pounding fury that uses a field-replaceable cone/coil assembly. Now enters the next chapter in the SoloX saga – the supersized smackdown is now available in a 10 and 12 too! KICKER’s most advanced subwoofers ever, the SoloX has been engineered with serious autosound competitors in mind. The SPL levels can get brutal in the lanes (many interiors have buckled under SoloX pressure), but the SoloX has already earned its sound-quality stripes too, winning IASCA and USACi SQ world championships. That means they sound good… really good. In its first year, the S18X set the industry on its ears (probably for protection!) with its heavy introduction, and it remains the centerpiece in the KICKER lineup with unimaginable power handling (5,000 watts RMS; 10,000 watts peak) and freakish size. All three use a field-replaceable, stamped-steel cone/coil assembly called a SPAIR. When it gets that loud, subs sometimes blow up, and we know you guys will give it a shot. That’s what the SPAIR is for – leave the BAM™ (Basket And Motor assembly) in the install and bring in the cone/coil piece for replacement.
Kicker 07S10X2
Car Audio Blog
Alpine IVA-D310 Head Unit Features:
DVD/CD receiver with built-in amplifier (18 watts RMS/50 peak x 4 channels; CEA-2006 compliant)
Motorized, retractable 7" LCD monitor with PulseTouch controls
Detachable control panel
Audio/video input
Backup camera input
Navigation input
White LED secondary display for use when monitor is retracted
Plays DVDs, DVD-Rs, DVD-RWs, CDs, CD-Rs, CD-RWs, and MP3/WMA discs
Direct-touch DVD menu control
Bass Engine Plus
4-channel time correction
3-position high-/low-pass crossover
Bass and treble center frequency control
Subwoofer level and phase control
MediaXpander
iPersonalize lets you create and download custom Bass Engine settings at Alpine's website, then upload them into the system
controls XM or SIRIUS Satellite Radio
CD changer/TV tuner controls
Compatible with Alpine iPod interface adapter
Audio/video output
DVD/CD signal-to-noise ratio: 105 dB
FM sensitivity: 9.3 dBf
Front, rear, and subwoofer preamp outputs
Digital output for optional surround-sound processor
MaxTune SQ AM/FM tuner
18 FM/6 AM presets
Wireless remote
DVD/CD frequency response: 5-20,000 Hz
The Clarion N.I.C.E 430 is just the latest stop on my winding journey to find the portable GPS unit that meets all my needs.
The trade-off on this one was Text-to-Speech, which it doesn't have. My thinking was that it wasn't a deal-breaker, as the GPS will announce turns, so who cares if it reads the street names or not.
But, after using other GPS units with this feature, I feel now that it IS a deal-breaker. Hearing the street name helps keep your eyes on the road, instead of reading the screen. It may not seem like much, but after continued use you REALLY start to miss it.
The other problem, that really IS a deal-breaker, is the sluggish response from the unit, surprising since it sports a pretty hefty 400Mhz processor. Route calculation is slow, but more importantly, on-the-fly route correction if you miss a turn is REALLY slow, so much so that you'll regularly miss a quick turn after re-calculation. This, partnered with very slow satellite aquisition sealed the deal for me, and I returned the Clarion.
Strike three was the Bluetooth function, which is spotty at best. It lost the connection to my Blackberry numerous times, and the worst is that THERE IS NO PHONE DIRECTORY. A fatal omission, I thought the idea of handsfree was to avoid fumbling for phone numbers?
A shame really, because of all the GPS units that have come before, the Clarion definitely has the most robust software. You have complete control over editing the route, and the turn-by-turn itinerary is great, and even includes major streets you'll pass to your next turn. The screen is also easy on the eyes, clear and vibrant. Unfortunately, the map screen renders the text very small, making it hard to read street names on it.
A great navigation system should be simple to use, provide intelligent routing with rich data, and feature entertainment options that make driving more enjoyable and convenient. And you shouldn't have to break the bank to get it all. Today, that navigation system is here: the Pioneer AVIC-D3. Commutes, traffic, and road trips have met their match.
Pioneer AVIC-D3 Navigation System Features:
- Fast and powerful DVD navigation platform
- DVD Video playback for your favorite movies
- Match your dash with customizable illumination
Pioneer AVIC-D3 Navigation System Features:
- Fast and powerful DVD navigation platform
- DVD Video playback for your favorite movies
- Match your dash with customizable illumination
JVC KD HDR1 is one of the few in-car stereos on the market that comes with a built-in HD (hybrid digital) radio tuner. HD radio works by sending out a traditional analog signal as well as digital signal, which can be used to transmit text data such as song and artist details. Radios with a built-in HD receiver sort through the multiple signals and reproduce the original broadcast without the multipath distortion associated with standard analog FM and AM reception. The KD HDR1 can also play MP3 and WMA discs and can be connected to iPods and satellite radio via add-on modules.
JVC KD HDR1 Head Unit Features:
- Power Output: 200W Max. (50W X 4),20X 4 (RMS)
- Built-In HD Radio Tuner with Multi-Cast Capability
- Ready For Ipod*
- Sat Radio Ready
- MP3/WMA Compatible with ID3/WMA Tag
JVC KD HDR1 Head Unit Features:
- Power Output: 200W Max. (50W X 4),20X 4 (RMS)
- Built-In HD Radio Tuner with Multi-Cast Capability
- Ready For Ipod*
- Sat Radio Ready
- MP3/WMA Compatible with ID3/WMA Tag
Car electronics (audio and video) are considered to be an essential part of any car. Electronics components of a car have been rising every year. But getting to know how much content is in the average vehicle now and how much will be there in the future is not as simple as we can imagine. Studies have shown that the use of electronics in cars is growing every year. However, this data enlightens and confuses at the same time. It has been estimated that the number of microprocessors found in our cars are increasing. The intent is to demonstrate an astounding amount of computing power. I’ve seen estimates ranging from a few dozen microprocessors up to a hundred microprocessors per vehicle in some luxury models.
The main reason of the increasing number of car audio and video electronics is due to the massive addition of car accessories and functions especially in luxury car. Now you can make phone calls right from your car without having to use your actual phone. More car speakers and sound power have been implemented in new cars.
Well known car manufactures such as pioneer, kenwood, Sony, Kicker audio have even introduced new car audio and video technology for those who are looking to upgrade their car sound capabilities. Kenwood for example, has introduced their P-NAV6019 navigation system where they combined the high-end mobile DVD Receiver and Navigation system into an aggressively priced product. Moreover, Pioneer has presented the new TS-SW3041D subwoofer with multiple patent-pending features to deliver the big bass performance of a full-size subwoofer, but in a compact design that can be installed either behind or under seats depending on the type of vehicle. Sony has introduced the new CDX-GT110 CD receiver that features aux-in and a removable faceplate with a blue 13-segment LED display.
Car audio and video electronics plays an important role in car technology and electronic components are increasing yearly to provide comfort and luxury to our cars.
 -
-  -
-  - Car Audio Systems Blog
The main reason of the increasing number of car audio and video electronics is due to the massive addition of car accessories and functions especially in luxury car. Now you can make phone calls right from your car without having to use your actual phone. More car speakers and sound power have been implemented in new cars.
Well known car manufactures such as pioneer, kenwood, Sony, Kicker audio have even introduced new car audio and video technology for those who are looking to upgrade their car sound capabilities. Kenwood for example, has introduced their P-NAV6019 navigation system where they combined the high-end mobile DVD Receiver and Navigation system into an aggressively priced product. Moreover, Pioneer has presented the new TS-SW3041D subwoofer with multiple patent-pending features to deliver the big bass performance of a full-size subwoofer, but in a compact design that can be installed either behind or under seats depending on the type of vehicle. Sony has introduced the new CDX-GT110 CD receiver that features aux-in and a removable faceplate with a blue 13-segment LED display.
Car audio and video electronics plays an important role in car technology and electronic components are increasing yearly to provide comfort and luxury to our cars.
- - - Car Audio Systems Blog
Alpine is revolutionizing the car-audio market with the introduction of the industry's first car sub woofers systems based on Linear Array Transducer (LAT) technology. Introducing one of the two new Powered LAT Subwoofer Systems, the PLV-7. The PLV-7 integrates Alpine's new advanced digital switching amplifier with a radically new form factor loudspeaker, all housed within a cutting-edge enclosure.The LAT subwoofers, paired with Alpine's new PDX digital amplifiers, have been engineered with a patent-pending Ultra Reflex enclosure design. Each individual component of the PLV-7 was specifically designed from the ground up to achieve optimum performance for the car audio market. The resulting systems deliver ground-pounding, tight bass with no mechanical vibration and clean, accurate control for an exceptionally powerful and uncompromised sound experience.You no longer have to sacrifice car storage space, thanks to the system's exclusive compact design. The PLV-7 has a built-in 500-watt RMS digital switching mono amplifier and features six 7-inch cones that produce the same output as two 12-inch subs while using 30 percent less space.
One of the best things you can do for your car audio system is to properly tune it. There are several variables to consider when doing this, and I am going to walk to through the most important ones so you will have a good understanding of how to get the most "bang" for the buck from you system.
Assuming you have an amplified system with one or more subwoofers, you can dial in your system to give you the best sound and have the durability you want from it. It starts at the head unit. You want a head unit with a good, strong output signal, between 4 and 5 volts on its pre-outs. Audiphiles tell us that 2-3 volts of good clean signal is good too, but that will require a little more amplifier power to get the decibels we're looking for. You also want a head unit with an adjustable subwoofer level. Start by tuning the stereo without the subs on. Add your bass and treble until you get the desired sound with minimal distortion at the loudest volume setting you will listen to it at. This is generally about 2/3 max volume. Once you are happy with the low/mid/high sound from the multirange speakers, we can add in the subs. If applicable, tune the sub outputs to about 2/3 maximum, and head to the amp. Start at the amp and adjust the frequency and the level to minimum, and turn the volume up to the the same loudest point we were working with earlier. Pull your frequency to about half way, and slowly adjust the power level upwards. If you hit the zone you want, stay there. Keep in mind, this is only a safe adjusting technique with a speaker system that matches the power output of the amplifier. If you want more from your system, incrementally adjust the frequency down slightly with the increases in power level. Your goal is to get a loud, clear bass from the subs that DOES NOT CLIP OUT under the loudest conditions you anticipate. If the amp clips out, then adjust the power level lower until it is back in the safe zone. Once the system is set where you want it, don't mess with it. Leave the levels on the head unit and the amp alone. The mistake I see with blown speakers and amps is trying to show them off with all the levels maxed out. This produces a lot of power at a high distortion level, which is damaging to the speakers and the amplifier. If you want a louder sound than what you have by tuning your system this way, it may be time to upgrade.
If you find you need help tuning your car audio system, contact Majestic Modifications by emailing support@majesticmodifications.com.
Brought to you by the sound experts at Majestic Modifications Auto Parts and Accessories.
For some, the prospect of changing out speakers is a daunting one, since you have to remove the door panels to access the speakers tucked away within its walls. They are not a tricky as they seem, if you know the right techniques.  The first thing to do is to locate any screws holding the panel in place. These are generally found in or under the armrest piece, in the door opener latch, or near the bottom of the door panel. Remove as many as you can find to start.
With the screws removed, you will need to carefullfy pry the door panel off the door. Start in the bottom corner nearest the speaker. Gently pull the panel until it pops loose. There are usually several clips holding it in place. Work around the bottom of the door panel popping the clips out. Be careful to not break them, because you will beed them to reinstall it. Continue around the outside of the panel until you have removed as many of the clips as you can. If you have power windows, doors, etc, remove the control panel from the door panel. It is usually clipped in place, and can be carefully pried out. Look for small notches that may give away the position of the clips. If you have mechanical windows, you will need to push the door panel into the door at the window crank, and look for the snap ring clip holding it in place. With a thin flathead screwdriver, pop the clip loose, taking special note of where it goes, as you will need it to secure the piece back in place. Once this is removed, you should have enough clearance to reach the speaker. If not, you can attempt to completely remove the door panel by sliding it upwards and out of the window compartment. You may be caught up by the door opener latch. These can be a little tricky, as some will slide in place horizontally, screw in, or pop out. Look for screws, and if you don't find any, try sliding it horizontally towards the inside. If that doesn't work, see if it pops straight out. it will be connected to the bars that pull the door latch, so they will have to be positioned correctly for the door panel to be removed. If there is a triangular piece of trim in the top corner of the door panel, you will need to remove it also. It also clips in place and can be removed. This should allow the door panel to slide out, assuming you have disconnected the control panels electrical wires.
You should now be in full view of the door speakers. It can be removed by removing the four screws holding it in place. You may also find that the connectors on these speakers won't work for your aftermarket ones, so you will have to clip the wires and attach the end connectors provided with your speakers. Pay attention to positive and negative here. if you are unsure of what is what, there are a few ways to check. Look at the terminals on the factory speaker. it may have a "+" and "-" sign designating positive and negative. If it doesn't tell you, you can log on to installdr.com and look up the color codes for the speaker, or try the battery test. Take a good charged battery and place one of the factory speaker wires on the positive, and one on the negative of the battery. If the speaker pushes out, the polarity is correct as you have it, and attach the wires accordingly. If it pushes in, the polarity is reversed, so reverse the batter and try again. If it pushes out, wire the speakers following that polarity.
Install the speaker in the door by replacing the 4 screws and securing it in place, and reinstalling the door panel. be sure to slide it back down in place, and line up the clips exactly before applying pressure to reattach them. You don't want to break any of those. Finish screwing the door in place, then attach the window control panel/window crank, and congratulations, your done!
If you run into problems with your door panels, you can contact us at support@majesticmodifications.com for assistance.
The first thing to do is to locate any screws holding the panel in place. These are generally found in or under the armrest piece, in the door opener latch, or near the bottom of the door panel. Remove as many as you can find to start.With the screws removed, you will need to carefullfy pry the door panel off the door. Start in the bottom corner nearest the speaker. Gently pull the panel until it pops loose. There are usually several clips holding it in place. Work around the bottom of the door panel popping the clips out. Be careful to not break them, because you will beed them to reinstall it. Continue around the outside of the panel until you have removed as many of the clips as you can. If you have power windows, doors, etc, remove the control panel from the door panel. It is usually clipped in place, and can be carefully pried out. Look for small notches that may give away the position of the clips. If you have mechanical windows, you will need to push the door panel into the door at the window crank, and look for the snap ring clip holding it in place. With a thin flathead screwdriver, pop the clip loose, taking special note of where it goes, as you will need it to secure the piece back in place. Once this is removed, you should have enough clearance to reach the speaker. If not, you can attempt to completely remove the door panel by sliding it upwards and out of the window compartment. You may be caught up by the door opener latch. These can be a little tricky, as some will slide in place horizontally, screw in, or pop out. Look for screws, and if you don't find any, try sliding it horizontally towards the inside. If that doesn't work, see if it pops straight out. it will be connected to the bars that pull the door latch, so they will have to be positioned correctly for the door panel to be removed. If there is a triangular piece of trim in the top corner of the door panel, you will need to remove it also. It also clips in place and can be removed. This should allow the door panel to slide out, assuming you have disconnected the control panels electrical wires.
You should now be in full view of the door speakers. It can be removed by removing the four screws holding it in place. You may also find that the connectors on these speakers won't work for your aftermarket ones, so you will have to clip the wires and attach the end connectors provided with your speakers. Pay attention to positive and negative here. if you are unsure of what is what, there are a few ways to check. Look at the terminals on the factory speaker. it may have a "+" and "-" sign designating positive and negative. If it doesn't tell you, you can log on to installdr.com and look up the color codes for the speaker, or try the battery test. Take a good charged battery and place one of the factory speaker wires on the positive, and one on the negative of the battery. If the speaker pushes out, the polarity is correct as you have it, and attach the wires accordingly. If it pushes in, the polarity is reversed, so reverse the batter and try again. If it pushes out, wire the speakers following that polarity.
Install the speaker in the door by replacing the 4 screws and securing it in place, and reinstalling the door panel. be sure to slide it back down in place, and line up the clips exactly before applying pressure to reattach them. You don't want to break any of those. Finish screwing the door in place, then attach the window control panel/window crank, and congratulations, your done!
If you run into problems with your door panels, you can contact us at support@majesticmodifications.com for assistance.
Da biste ugradili subwoofer u auto, prvo ga morate imati, to je svima jasno.
Ali to nije sve što trebate imati:
Što vam treba?
Prvo - morate imati auto radio koji ima audio izlal (audio out) koji zaobilazi pojačalo radija, jer morate znati da nemožete pojačavati več pojačani signal. znači dva okrugla chinc izlaza crveni i bijeli.
Drugo - treba vam chinch (činč) kabel koji spaja radio sa auto pojačalom, dakle...
Treče - treba vam auto pojačalo. Za pojačalo vam je potrebno dodatno napajanje strujom, struju morate dovesti direktno sa akumulatora, jer u suprotnom nečete imati dovoljno jak napon. Da bi doveli struju morate imati oko 3 metra kabla, komada 2.
Provučete struju od akumulatora u unutrašnjos automobila, što bi mogao bit problem jer treba pronači rupicu kroz koju čete "progurati" kabel, ali ako vas mogu utješiti svaki automobil ima predviđenu "rupicu" , tijekom fiksiranja kabela ispod haube pripazite da ga ne provlačite blizu dijelova automobila koji proizvode veliku toplinu, da nebi došlo do topljenja kabela i nastanka kratkog spoja što bi prouzročilo katastrofalne posljedice, zato vam je naj sigurnije provuči kabel kroz plastiku koja je otporna na velike temperature...
uglavnom kada ste to napravili preporučam da na plus kabel stavite osigurač, (za koji amper jači nego što je na pojačalu) i naravno sklopku da možete isključiti pojačalo kada ga ne koristite. zatim spojite žice na pojačalo ali pazite da ne obrnete polaritet jer je vrlo vjerovatno da če tada izgoriti osigurač na pojačalu ili samo pojačalo...
Četvrto - ubacijete subwoofer u gepek i provlačite žicu od woofera do pojačala, pojačalo možete smjestiti ispod suvozačevog sjedala.
Ako ste sve radili točno kako sam vam sada opisao, vjerujem da se sada idete provozati svojim automobilom koji ima savršeno ozvučenje i kvalitetan zvuk...
Sretno
Car Audio Compontents
In the realm of car audio, the possibilities are endless. There are hundreds of brands and thousands of products out there. Majestic Modifications would like to help restore some order to the chaos of building your system. Lets look at some of the components that make up a car audio system.
The Head Unit
The Head Unit is the brains of the operation. Without this component, your car audio system can't and won't work. The head unitis the central processing device in the system.
The head unit controls all the functions in your car audio system. Music too loud? Turn down the volume. Too soft? Turn it up. Want more bass? Add bass input. In addition to volume, bass, etc., the head unit may contain other systems within its casing. These include: tuner, cassette, equalizer, CD or amplifier.
You see, in a home music system, where you have much more room, many stereo setups will include a separate box for each one of these components -- CD, cassette, etc. You may have a home system like that yourself. In a car, with its space limitations, these components are often crammed into one box -- the head unit. This depends upon a number of factors, such as heat, space, cosmetic design and other concerns, and every car is different.
The Amplifier
All car audio systems have an amplifier, even if it's a small one. Occasionally the amplifier will be attached to the rear of the head unit; however, in most systems it is hidden elsewhere in the car to better dissipate heat.
Signal amplification is actually a two-stage process, handled by two separate components. These are the preamplifier and the power amplifier.
The preamplifier (preamp, for short) is a very tiny signal coming directly from the head unit. Whether it's reproducing a cassette signal, a CD signal, or an FM broadcast, the preamp puts out a signal that the amplifier can use. This is where the power amplifier takes over.
It's the power amp's job to take the signal from the preamp and boost it into the audible range. We'll cover this in more depth in our Amplifier column in this series. Again, because of heat, most amplifiers are located away from the head unit.
The Speakers
The speakers take the boosted signal from the power amp and create sound waves. Essentially, speakers transform electrical energy (the amplified signal) into mechanical energy (the motion of the speaker cone).
For now, know that all sound is vibration, which is a chain of frequencies in the air that eventually vibrate the membranes in your eardrums.
Sound energy is measured in wavelengths, known as hertz, with the audible range falling between 20 to 20,000 cycles. A cycle is the distance from the top of one wavelength to the top of the next.
There are three typse of speakers that produce sounds across the audible spectrum: woofers, tweeters and midrange drivers.
As the name implies, the woofer reproduces the lower frequencies. The tweeter, also aptly named, replicates the highest register. The midrange handles the frequencies in between.
Auxiliary Input Devices
Components such as CD changers and equalizers, not to mention cell phones, navigation systems, MP3 players and many of the newer technologies, interface with the head unit for amplification and signal processing.
We hope this helps you gather a basic understanding of car audio technology. Look for an in-depth view inside the head unit in our next column.
Installing Head Units/CD Players
Upgrading the sound system is usually one of the first modifications attempted when we talk about car customization.
Begining with the head unit, I would suggest buying the stereo wiring harness for your vehicle application. This will make the installation easier for you if you are a beginner, and it allows for easier replacement of the stock radio (if you choose to sell the vehicle in the future) and swaping or upgrading to a different aftermarket head unit.
Begin by disconnecting the negative battery cable from the battery. This will ensure that you don't accidentally cross any wires and burn out a new piece of equipment. Next, remove the old head unit. If you need to see how this is done on your specific vehicle, you can look up your vehicles application on installdr.com. This is a great resource for seeing pictures of how to remove the head unit. Once it is loose, disconnect the wiring harness and the antenna from the head unit and remove it completely.
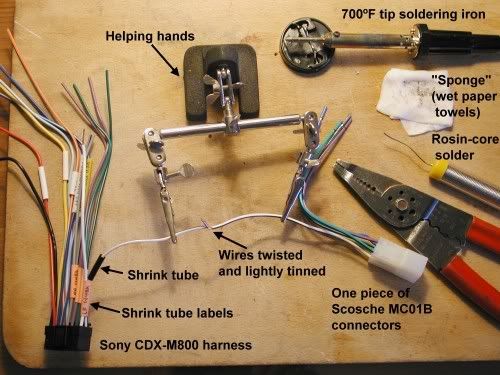
Once you have obtained the wiring harness, you will notice the color coded wires in the back of the head unit. The head unit wires and the wiring harness wires will be partially spliced for easy installation. There are several good ways to connect the wires. One way is to use butt connectors, which crimp the wires within a connector. These can be picked up almost anywhere that sells/installs head units, walmart, etc. My favorite way requires a soldering iron and heat shrinking sleeves. Twist the wires together tightly, and fold them over paralell to one of the wires. Apply just enough solder to weld the two wires together. Then slide the sleeve over the connection and heat it with a heat gun or good hair dryer. I have had to rewire or repair systems where butt connectors were used, but this could be installer error, and not a problem with the connectors themselves. I have never had any of the soldered connections fail.
Once all the connections are made, and the sleeves heated and shrunk in place, I like to take a zip tie and tie them all together. Connect the wiring harness of the head unit to the wiring harness connected to the vehicle. Plug in the antenna (you may find you need an antenna adapter in some applications). Now slide the head unit in place, but don't attach it yet. Reconnect the negative battery cable and turn on the head unit (make sure the key is turned to the ACC postion). It should be functioning properly at this point. If you plan on adding an amp, or have purchased one for this setup, turn the unit off and connect the RCA cables. Run them through the dash to the floorboard and to the amp (more on how to successfully do this in future post).
If you encounter problems, you can email support@majesticmodifications.com for help.
Upgrading the sound system is usually one of the first modifications attempted when we talk about car customization.
Begining with the head unit, I would suggest buying the stereo wiring harness for your vehicle application. This will make the installation easier for you if you are a beginner, and it allows for easier replacement of the stock radio (if you choose to sell the vehicle in the future) and swaping or upgrading to a different aftermarket head unit.
Begin by disconnecting the negative battery cable from the battery. This will ensure that you don't accidentally cross any wires and burn out a new piece of equipment. Next, remove the old head unit. If you need to see how this is done on your specific vehicle, you can look up your vehicles application on installdr.com. This is a great resource for seeing pictures of how to remove the head unit. Once it is loose, disconnect the wiring harness and the antenna from the head unit and remove it completely.
Once you have obtained the wiring harness, you will notice the color coded wires in the back of the head unit. The head unit wires and the wiring harness wires will be partially spliced for easy installation. There are several good ways to connect the wires. One way is to use butt connectors, which crimp the wires within a connector. These can be picked up almost anywhere that sells/installs head units, walmart, etc. My favorite way requires a soldering iron and heat shrinking sleeves. Twist the wires together tightly, and fold them over paralell to one of the wires. Apply just enough solder to weld the two wires together. Then slide the sleeve over the connection and heat it with a heat gun or good hair dryer. I have had to rewire or repair systems where butt connectors were used, but this could be installer error, and not a problem with the connectors themselves. I have never had any of the soldered connections fail.
Once all the connections are made, and the sleeves heated and shrunk in place, I like to take a zip tie and tie them all together. Connect the wiring harness of the head unit to the wiring harness connected to the vehicle. Plug in the antenna (you may find you need an antenna adapter in some applications). Now slide the head unit in place, but don't attach it yet. Reconnect the negative battery cable and turn on the head unit (make sure the key is turned to the ACC postion). It should be functioning properly at this point. If you plan on adding an amp, or have purchased one for this setup, turn the unit off and connect the RCA cables. Run them through the dash to the floorboard and to the amp (more on how to successfully do this in future post).
If you encounter problems, you can email support@majesticmodifications.com for help.
Subscribe to:
Posts (Atom)