In the realm of car audio, the possibilities are endless. There are hundreds of brands and thousands of products out there. Majestic Modifications would like to help restore some order to the chaos of building your system. Lets look at some of the components that make up a car audio system.
The Head Unit
The Head Unit is the brains of the operation. Without this component, your car audio system can't and won't work. The head unitis the central processing device in the system.
The head unit controls all the functions in your car audio system. Music too loud? Turn down the volume. Too soft? Turn it up. Want more bass? Add bass input. In addition to volume, bass, etc., the head unit may contain other systems within its casing. These include: tuner, cassette, equalizer, CD or amplifier.
You see, in a home music system, where you have much more room, many stereo setups will include a separate box for each one of these components -- CD, cassette, etc. You may have a home system like that yourself. In a car, with its space limitations, these components are often crammed into one box -- the head unit. This depends upon a number of factors, such as heat, space, cosmetic design and other concerns, and every car is different.
The Amplifier
All car audio systems have an amplifier, even if it's a small one. Occasionally the amplifier will be attached to the rear of the head unit; however, in most systems it is hidden elsewhere in the car to better dissipate heat.
Signal amplification is actually a two-stage process, handled by two separate components. These are the preamplifier and the power amplifier.
The preamplifier (preamp, for short) is a very tiny signal coming directly from the head unit. Whether it's reproducing a cassette signal, a CD signal, or an FM broadcast, the preamp puts out a signal that the amplifier can use. This is where the power amplifier takes over.
It's the power amp's job to take the signal from the preamp and boost it into the audible range. We'll cover this in more depth in our Amplifier column in this series. Again, because of heat, most amplifiers are located away from the head unit.
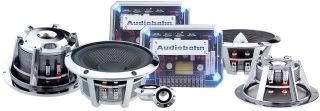
The Speakers
The speakers take the boosted signal from the power amp and create sound waves. Essentially, speakers transform electrical energy (the amplified signal) into mechanical energy (the motion of the speaker cone).
For now, know that all sound is vibration, which is a chain of frequencies in the air that eventually vibrate the membranes in your eardrums.
Sound energy is measured in wavelengths, known as hertz, with the audible range falling between 20 to 20,000 cycles. A cycle is the distance from the top of one wavelength to the top of the next.
There are three typse of speakers that produce sounds across the audible spectrum: woofers, tweeters and midrange drivers.
As the name implies, the woofer reproduces the lower frequencies. The tweeter, also aptly named, replicates the highest register. The midrange handles the frequencies in between.
Auxiliary Input Devices
Components such as CD changers and equalizers, not to mention cell phones, navigation systems, MP3 players and many of the newer technologies, interface with the head unit for amplification and signal processing.
We hope this helps you gather a basic understanding of car audio technology. Look for an in-depth view inside the head unit in our next column.